My HP printer has ink but won’t print: troubleshooting

Certain things make us lose our patience. Maybe your computer has crashed, your neighbours are doing building work on a Saturday morning, or your HP printer doesn’t print or prints with smudges, discolouration, or no black... What should you do if you haven’t received the ‘out of ink’ warning message? Keep calm. This may happen for a number of different reasons. We’ll explain what they are and how to resolve them.
Reasons why your HP printer has ink but won't print
There are several reasons that can lead to your HP printer not printing or printing incorrectly even if there is ink in the printer. This may seem obvious, but it sometimes happens: first make sure your paper tray has paper in it. Misalignment, clogged printheads, faulty data communication or insufficient ink levels can also be sources of the problem.
Solutions if your HP printer has ink and won't print
Before discussing the most common solutions one by one, remember that some paper, such as photographic paper, only has one printable side (usually the smooth side). Make sure it is loaded correctly and never use crumpled or folded paper.
Also check that the printer settings are correct and, of course, that it is properly connected to the power supply.
Restart the printer
First of all, let's check that the printer is switched on and that it is securely connected to the power supply and to the computer. Check that the cables are not loose and restart it. If you print via wifi, check that it’s enabled. Also make sure that the socket or power terminal where you have connected the power cord has current and that no wires are loose.
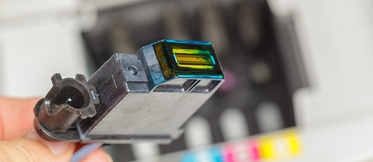
Check the ink level of the cartridges
You should now check the amount of ink remaining in your cartridges, and there are several ways to do this. Take note.
- From the HP Printer Assisant:
HP printers include software with a tool that allows you to check certain technical issues. Look for 'Printer Assistant' from the downloaded programs on your computer and in the menu on the top bar you will see the tab 'Estimated ink levels'. When you click on this option, a graph will appear showing you the approximate amount of ink you have left.
- From the printer control panel:
According to HP’s official website, to check ink levels from your printer’s control panel you should look for “an ink drop icon or cartridge icon, an ink levels menu or a toner level indicator to check estimated ink or toner levels”. With this option, as with the previous one, a graph will appear on the panel with the printer’s estimated ink levels.
- Applications that can be downloaded on Windows to check ink levels on HP printer:
It’s easy to download HP Smart from the official Windows store and it's ideal for checking ink levels quickly. Just open it and link it to your printer to detect the status of your cartridges.
HP also recommend their HP Print and Scan Doctor app, and yes — it's also great for checking ink levels.
If your ink levels aren't low, let's move on to the next step. Otherwise, you know what to do — replace the spent cartridges! In Webcartridge you will find the compatible and original cartridges you need for your HP printer.
Cleaning your ink cartridges
As HP explain, cleaning the ink cartridges can improve the quality of your prints. Moreover, this step can be easily performed from the printer control panel.
- First, make sure there’s paper in the in-tray. Then, on the printer control panel, swipe to the left and press Setup.
- Now select Tools and then Clean Cartridges.
- The printer will print a Print Quality Diagnostic report.
- Examine the print quality in the print quality diagnostic report and, if the print quality is acceptable, click 'No'.
- If the print quality is unacceptable, click 'Yes' when the panel prompts you to proceed to the next cleaning stage.
Checking and cleaning the print heads
Clogged printheads can also cause many printing errors. To clean them, follow these steps:
- Look for Setup on the control panel of your printer and click on it.
- In Setup, go to Tools and press ‘OK’.
- A new window will open. Swipe through the options until you find ‘Clean Printheads’. Once you’ve found it, touch this option and then touch ‘OK’. The printer will start cleaning the printheads automatically.
- Once finished, perform a test print.
- One clean may not be enough and you may have to repeat the procedure a couple of times.